About Me

My photo
Paonia, CO, United States
I have discovered that life is a roller coaster and I'm learning to enjoy the ride! I am a married mom of 4. I work part-time outside of the home and, of course, more that full time as a wife and mother! I do classes from my craft room in the basement...which is why we call it the "Craft Cave."

Sunday, August 1, 2010

August 2010


August! Grab up the last few scraps of summer!
DETAILS:
Stamps: The Angel Company T-2708 For all Seasons
Paper: Sam's Club double sided, scraps of white, pink, and lime green
Supplies: 4" coaster & calendar from Stamp On This, BIA 1" rings

Monday, July 19, 2010

Boots...

The favorite card at the sorority get-away was this...

Do you like the bandana fabric? I think it makes the whole card.
You can't really tell in the photo, but the boot on top is cut out and popped up with mounting foam.


Of course, you make make a variety of similar cards by changing the boots, the sayings, the cardstock or carstock treatment, adding knots to the fabric, all kinds of things...
what would you change?


Sunday, July 18, 2010

Punch Storage in the New Cave


I'm afraid I can't do pictures of the whole studio just yet. I'm still getting settled, picking up, organizing...
But, since I promised a photo or two of the new punch storage my DH made for me and that little corner of the room is pretty well done...

Believe it or not, we used grounding rods and eye screws. The wall is about 6 feet long and then it bends around the corner another 18" or so.

It's all very functional and sturdy. I only have one problem...

there's not a lot of room for growth!
'Course, after 14 or so years of stamping, I'm hoping I won't need too many more supplies. Is anyone else as much of a hoarder as I am?

Thursday, July 15, 2010

July 2010


Now that it's the middle of the month....

I thought maybe I should probably post the July calendar. DUH!

Geez! Summer is half over already and I hope you're all soaking up the rays and havin' some fun!

Tuesday, June 29, 2010

March 2010, April 2010, May 2010, June 2010

Well, dang it! I could have at least sceduled posts for the calendars for the month in my moving absentia, huh?

Just a little update.... the new and improved Craft Cave is almost done! Gadzooks!! You know, I was beginning to think it might never happen. I'm hoping to post some pics by the weekend. I have to show off my fabulous punch bars! AWESOME!! And I do actually have a few new cards to post after my weekend away with the Sorority girls.

Well, here are the calendars... just to catch up.


Wednesday, March 10, 2010

Moving....

The Craft Cave will be relocating at the end of the month. Not the internet location, but the physical location. Classes will resume when we are settled back in sometime in April so watch for class postings coming as soon as MAY!! I'm hoping to plan an All Occasion Stamp-a-Stack!!
Right now all the supplies are getting boxed up so... can't do much crafty stuff for a while!!

Monday, February 15, 2010

A day late...


...for you to see all the goodies I made for Valentine's Day. The good news, however, is that they were done in time for all the festivities.
I do hope that all of you had a Valntine's Day with all the trimmings that you all so greatly deserve!
Normally I would have to say that I am NOT a fan of the clear acrylic stamps. I'm just a real rubber kind of gal. Having said that, I have to admit I am very impressed with the Papertrey Inks sets that I ordered specifically for Valentine's Day! I just could not resist the images! They are very well thought out and both the Tiny Treats Valentine's and the Simple Valentine sets work fabulously together.
Now, I am NOT on their design team and do not receive any $$ from them for my opinion. So, having said all that, I have to tell you I am impressed with Papertrey Ink. First, they released this set in December I believe. Plenty of time for me to plan for the next holiday. Also, when they released the images for this set, it came with a blog hop showing a bunch of fabulous ideas of how to use these sets. Then, when I decided I wanted these, and I had enough time to save and budget for these. (Let's face it, we are all having budget issues!)
I ordered them online about mid-January and they arrived in just a couple days!! AND when I opened the box I was very pleased with their packaging!! First of all, no nasty environmentally UNfriendly styrofoam peanuts!! BLEH!
Of course there was packaging paper, that I promptly added to the fire box. Here is the cool part though! Each set was in an adorable clear box, that can easily be repurposed later as a fabulous creation. (These boxes were nicely wrapped in tissue, btw.) Then included inside the box was a CD case to store the stamps, indexing sheets for the CD case, along with a label for the spine to make them easy to locate. The stamps were on some clear acetate, which can be reused in another project, of course. It also included an instruction sheet with care recommendations and tips for usings your stamps. Plus it also referenced their website where all the blog hop ideas can be found easily. Cool, huh?


And just look at how amazingly cute the images look! And they all have sayings that totally compliment the images. This set is perfect for the kiddo's valentines and I think I have been searching for a set just like this for 13 years!
These are the treats we sent to school with Megan and Dom for their classmates. I used the Shadowbox BigzXL plate from Sizzix to create the boxes. Cute, huh? And, as you can see the Tiny Treats Valentine set was PERFECT!!
So, there I was on Thursday night, realizing I didn't have anything special for the teachers. Instead of instant panic, I quickly went to Julie's Blog and quickly found the perfect idea! Gotta love Jewels! She always exemplifies SIMPLE, SMART, SOPHISTICATED!!! How easy to compliment this idea easily with the Papertrey Ink sets along with my JustRite What's Cookin' Borders & Centers. Love it!!
I know these adorable petal card treats have made the rounds, but you know, I've actually discovered that a great idea just never gets old. These were fantastically popular with my sorority sisters. Let's face it, we ALL love to get treats!!

Saturday, January 30, 2010

Happy Heart Month!

Here's the calendar for February!


Just so you all know...
I'm not sure how often I will be posting for a few months. I have a few things I'm working on in life in general... simplify and declutter... and also some major family stuff I'm hoping will be in the works very soon.
Now, about the stamping stuff. I'm still reevaluating and trying to make a decision about which direction it will all be going. I haven't been content for a while with the current direction, and my MOJO has suffereed tremedously because of my inner turmoil. I still plan on doing crafting classes, but may be heading in a more all encompassing direction with that rather than just stampin' & papercrafts. We'll, see...
'Nuff said there... for now!
For those of you interested in classes.... I'll let you know, if you let me know what kinds of classes you would like to see or what classes you want to continue!! Do you want more cards? More techniques? More mini-books? 4x6 scrapping? Specialty cards? What else would you like to do?
Thanks!!


P.S. I will also attempt to do better at giving you the info on the items I post. So....
Calendar page "deets":
Stamps: TAC: T-2708 For All Seasons
Calendar: Just Stamp It
Paper: Sam's Club special, basic black & white CS
Ink: Noir Palette
Coloring: Prismacolor & OPT, glitter pen
Other: 1" BIA rings

Tuesday, January 12, 2010

Simple & Easy gifts...

...are not just for Christmas. But that does seem to be the time when we all post that kind of stuff.

Here are a couple of items that never seem to get old for quick cute gifts. Just change out the paper and stamps and.... presto, bango! Ready for a different Holiday or Special Occasion!

These are, I admit, the Christmas versions, so.... use your own creativity and see what YOU can come up with!!


Tuesday, January 5, 2010

Board book calendar


Every year my hubby brings home a calendar from work. The problem is... it's just HUGE. Too big to hang on my cupboard doors. Before we needed this montrousity because he was doing crazy shift work. Now it's a much easier schedule too keep track of... 2 weeks days, 2 weeks swing. I don't need a gigantic calendar to tell me that.
So, I came up with a solution.
I used a board book and carefully cut it apart, two pages at a time, then glued the seam together to get one long piece.
I used the calendar download from Heather and printed it on portrait paper rather than landscape. Perfect size!
The blue background at the top is perfect for a 4x6 photo which can be changed out whenever.

Saturday, January 2, 2010

January 2010


Happy New Year!
Wishing all of you a properous, happy, and healthy new year to come.
This calendar uses the For All Seasons set in the TAC catalog. I'll post a page at the beginning of the month for the coming year.

Wednesday, December 23, 2009

Last minute Christmas Gifts...

It just wasn't my idea...

but when a friend needs help, I'm always on board.
So, Candy brought me this project and wanted to make more for Christmas gifts.


We've been having SO much fun. My craft room is an absolute disaster!


Lookie!!!
Are these just COOLEST PICTURE FRAMES YOU'VE EVER SEEN????
Well, I like 'em anyway!! Perfect for a 4 x 6 photo right from the camera!

Sunday, November 8, 2009

Sneak Peek #1

Here are some peeks at a few of the cards we will make at the Stamp-a-Stack this weekend!!
I hope you are excited! It will be LOADS of FUN!!


Reservations are filling quickly! Call me now to reserve your spot!!
Thanks!

Tuesday, November 3, 2009

4th Annual Stamp-a-Stack Update

Due to several requests, I have decided to continue with the Annual Christmas Stamp-a-Stack this year.

Saturday, November 14, 2009 11:00 till ??
Memorial Hall in Hotchkiss.

RESERVATIONS MUST BE MADE BY NOVEMBER 10th!!!
This special event is limited to 20 people, so please, reserve your spot NOW!!
It is not an easy task to prepare supplies for this event especially since my help and time are limited at best anymore.

Make 20 Christmas/Holiday themed cards from 10 available designs for $25
(or free with a $50 purchase from TAC)
Snacks will be available, but if you would like to bring something to share, it would be appreciated!
Remember, everyone who attends will get a prize!

Watch the blog for "sneak peeks"

Sunday, October 4, 2009

Witch Hat Candy Treat Tutorial

Supplies:
cutter
large and small circle coluzzle & foam mat
coluzzle swivel knife
decorator bag
black & white cardstock
8" black 3/8" ribbon
stamps & acrylic mount
ink (Noir & Orangerie shown here)
1 3/4" circle punch
1 1/2" circle punch
Not shown:
scissors
adhesive
1/8" punch
mounting foam
candy
Jar or glass

Directions:
1. Cut decorator bag down to 6" from tip.


2. Cut 1/2" slits about a quarter inch apart across the bottom (or open end) of the decorator bag.


3. Cut 2 circles from the black cardstock. (Iused the large circle coluzzle, 4th from the center. This will give you circles about 4" in diameter.)


4. On one of the circles, center the small coluzzle and cut a smaller circle out of the center. (Once again I used the fourth from the center, approximately a 2 inch diameter.)


5. Apply adhesive to one side of this circle with the cut out.


6. Open the decorator bag and one small section at a time, pulling the bag into the center of the circle, adhere the bag to the hat brim. (Hopefully you can understand what I mean from the picture. I used a jar to sort of hold or balance the bag while I did this.)
After you have the bag attached to the adhesive, you will need to apply adhesive over the bag that is attached to the brim of the hat. (You can use the edge of the jar to help with this.)
Fill up the bag with candy! Be careful not to get your candy stuck to the adhesive on the brim of the hat. (It also helps if you overfill the bag just a bit as the candy tends to settle after you turn it over.)
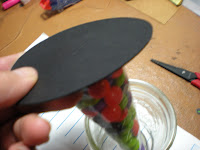
7. Attach the other circle and seal.


8. Turn your hat right side up!


9. Stamp your decorative element!
I used T- 3009 Glitter Goblins.
I stamped the image twice.


I punched the center out with the 1 1/2" punch and then inked the edges with Orangerie.


and then punched the base of my element out with the 1 3/4" punch.


I punched a small 1/8" hole for the ribbon at the bottom of my image and added some mounting foam and the center piece attached here.


Run both ends of the ribbon through the hole...


loop over the hat, tighten your ribbon and tie a decortive knot.


oooo! Almost done!


To make the spider charm to put on the tip of your hat you will need:
clear "shrinky dink" plastic
Staz-On ink
stamps (TAC-2600 Trick or Treat "retired" set used here)
1/4" hole punch
1/16" hole punch
thread
heat gun
heating surface (Iused a tile)
bamboo skewer (to hold the plastic while it melts)
a wood block (to flatten your shrinky dink, if needed)

Directions:

Stamp the spider and the saying on the plastic. (I stamped the spider on one side and the saying on the other.)
Punch out your image (1 1/2" circle used here)


Punch a 1/4" hole in your charm BEFORE YOU MELT IT.


Use a skewer to hold your image while you heat it. Remember the plastic will shrivel up as you heat it.


Thread some string through the hole on your shrinky dink charm.


Punch a 1/16" hole in the top of the decorator bag you used to make the witch hat. Thread your charm on and tie a knot.


Now you're done!!


Feel free to leave a comment if you have any questions!