
 Supplies:
cutter
large and small circle coluzzle & foam mat
coluzzle swivel knife
decorator bag
black & white cardstock
8" black 3/8" ribbon
stamps & acrylic mount
ink (Noir & Orangerie shown here)
1 3/4" circle punch
1 1/2" circle punch
Not shown:
scissors
adhesive

1/8" punch
mounting foam
candy
Jar or glass
Directions:
1. Cut decorator bag down to 6" from tip.
 2. Cut 1/2" slits about a quarter inch apart across the bottom (or open end) of the decorator bag.
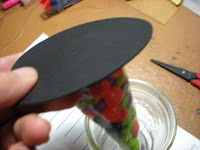
3. Cut 2 circles from the black cardstock. (Iused the large circle coluzzle, 4th from the center. This will give you circles about 4" in diameter.)

4. On one of the circles, center the small coluzzle and cut a smaller circle out of the center. (Once again I used the fourth from the center, approximately a 2 inch diameter.)
5. Apply adhesive to one side of this circle with the cut out.


6. Open the decorator bag and one small section at a time, pulling the bag into the center of the circle, adhere the bag to the hat brim. (Hopefully you can understand what I mean from the picture. I used a jar to sort of hold or balance the bag while I did this.)
After you have the bag attached to the adhesive, you will need to apply adhesive over the bag that is attached to the brim of the hat. (You can use the edge of the jar to help with this.)
Fill up the bag with candy! Be careful not to get your candy stuck to the adhesive on the brim of the hat. (It also helps if you overfill the bag just a bit as the candy tends to settle after you turn it over.)
7. Attach the other circle and seal.
Fill up the bag with candy! Be careful not to get your candy stuck to the adhesive on the brim of the hat. (It also helps if you overfill the bag just a bit as the candy tends to settle after you turn it over.)

7. Attach the other circle and seal.

8. Turn your hat right side up!

9. Stamp your decorative element!
I used T- 3009 Glitter Goblins.
I stamped the image twice.
 I punched the center out with the 1 1/2" punch and then inked the edges with Orangerie.
and then punched the base of my element out with the 1 3/4" punch.
 I punched a small 1/8" hole for the ribbon at the bottom of my image and added some mounting foam and the center piece attached here.
Run both ends of the ribbon through the hole...


loop over the hat, tighten your ribbon and tie a decortive knot.

oooo! Almost done!

To make the spider charm to put on the tip of your hat you will need:
clear "shrinky dink" plastic
Staz-On ink
stamps (TAC-2600 Trick or Treat "retired" set used here)
1/4" hole punch
1/16" hole punch
1/16" hole punch
thread
heat gun
heating surface (Iused a tile)
bamboo skewer (to hold the plastic while it melts)

a wood block (to flatten your shrinky dink, if needed)
Directions:
Stamp the spider and the saying on the plastic. (I stamped the spider on one side and the saying on the other.)
Punch out your image (1 1/2" circle used here)
Directions:
Stamp the spider and the saying on the plastic. (I stamped the spider on one side and the saying on the other.)
Punch out your image (1 1/2" circle used here)

Punch a 1/4" hole in your charm BEFORE YOU MELT IT.

Use a skewer to hold your image while you heat it. Remember the plastic will shrivel up as you heat it.

Thread some string through the hole on your shrinky dink charm.

Punch a 1/16" hole in the top of the decorator bag you used to make the witch hat. Thread your charm on and tie a knot.


Now you're done!!
Feel free to leave a comment if you have any questions!